Dimensions: 9.5″ W x 10″ H x 4.5″ D
Outlet Pressure: Adjustable outlet pressure of 0-60 psi per blend. Maximum outlet pressure will always be 10 psi lower than the minimum inlet pressure.
Standard Flow Capacity:
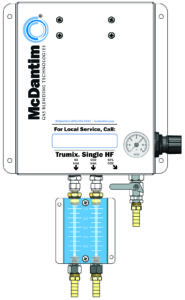
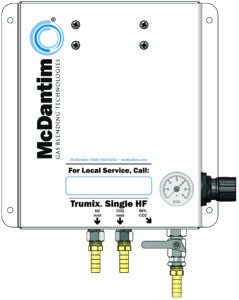
High Flow Capacity:
Accuracy and Flow Range: Maintains accuracy of +/- 2% of full scale or better within the flow range of 0.4 to 40 liters per minute (0.85 to 85 cfh.)
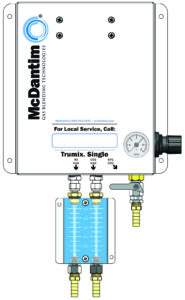
Our Trumix® blenders mix CO2 and N2 on demand and are best used for long-draw draft systems. The Trumix® Single blender comes preset with your custom blends to best fit your system. The panel mounts easily on the wall and is simple to install. With the Trumix® Single blender, customization of the blends gives you endless options and the flexibility to expand your draft beer selection. You could include low-CO2-content nitrogenated beers, high-CO2-content German-style beers, and domestic drafts on one system without the need for additional premixed cylinders.
Not sure which blends you need? Download the McDantim EasyBlend app, available on Android and iOS.
Features:
Easy installation.
No electrical setup is required.
5-Year Limited Warranty
Custom Blends: Each blender is built to order to suit your needs.
Does not operate if either supply gas fails or becomes empty.
Gas Supply Nonsense
Why Mixed Gas?
Generations of women in the Smith family had prepared pot roast the same way: cutting the ends off the roast. The youngest daughter asked why, and after a chain of weird conversations, the answer was: The pot roast didn’t fit in the super small oven the great-great-grandmother had, so she chopped the ends off. If it ain’t broke, don’t fix it. But sometimes, something we are used to doing or experiencing needs another viewpoint for improvement.
People are used to wasting beer. Bartenders open the tap and stick the glass under the faucet. Owners think the 2 gallons of beer that gets dumped from the bucket at the end of the night is normal. One of our first customers was a college bar with a direct draw and 60+ beers on tap. He told us that the blender saved him over $2,000/month in wasted beer compared to using 100% CO2.
Just because we’ve done it this way for generations, or because everyone else does it that way, doesn’t mean that it is the only way to do it. The cost of the correct mixed gas can save you the installation cost several times a year and improve your sales.
Another customer upgraded their gas supply without telling any staff and found a 30% increase in sales immediately. The initial beer ordered with dinner was good, so one good beer deserves another. Just because we don’t think it’s broken doesn’t mean we can’t fix it.
If you’re seeing these foaming issues and would like some guidance, call us or your draught system technician. Maybe your draught gas supply would benefit from mixed gas.
Written by Kayla Mann; July 2019.
I Can’t Pour Nonsense
I Can’t Pour: Guinness St. Patty’s Day Edition
Ahh, St. Patty’s Day. That lovely time of year when everyone is a little bit Irish and a lotta bit drunk and disorderly. I worked at an Irish pub here in Helena for a bit before I found my calling at McDantim as a sarcastic goofball who talks a lot. I had the singular distinct displeasure of working on St. Patrick’s Day shortly after being hired (Reminder: tip your bar staff enormously on St. Patty’s Day because walking through shoulder-to-shoulder crowds on a sticky floor trying not to spill beer while people are gesticulating like maniacs to get the bartender’s attention is not my idea of a good time.)
Every year, traditionally the day of or before St. Patrick’s Day, we’ll get phone calls about how the Guinness is pouring. Most times, happily, we can solve the issue quickly and the end user continues their merry way, shillelaghs and all. Unfortunately, we run into larger problems that need time to fix, which doesn’t exactly work for a tavern’s busiest day of the year. “I tried to pour my Guinness and it’s pouring like a milkshake,” or “I have to put Guinness on for the weekend on my 100% CO2 system. That should work, right?”
Fun Fact: McDantim got its start from Guinness’ quest to have the perfect mixed gas blend to dispense their liquid gold Guinness stout. We even have a commendation from Guinness for our product (shameless plug.)
Guinness, for peak pour-formance (my apologies,) uses a 25% CO2 / 75% N2 blend at around 35 psi. This combination results in the wonderful cascade of nitrogen bubbles and the creamy tawny foam. Now, let’s say you try to put Guinness on your 100% CO2 system with the same 35 psi, your carbonation level of 1.1 v/v skyrockets to 4.59 v/v. Thus, milkshake. Unfortunately, there isn’t enough time allotted in the day and a half before St. Patty’s Day to settle the keg, nor get a new one from your distributor and have it cold and unjumbled.
Here’s my plea, as a Guinness drinker not only on St. Patty’s Day: Check your Guinness several days before St. Patty’s and the bookending weekends so you can get the most out of your kegs and customers.
Written by Kayla Mann; May 2019.
Our blends are calibrated in-house and can not be changed in the field. However, if your beer is pouring flat or foamy, your blend or your applied pressure is likely wrong. Many of our national distributors sell a preset blender of 60% CO2, which generally works well for Ale and Lagers. However, this may not be the right blend for some applications. For example, if you are a brew pub pouring from a serving vessel, you are probably limited to 15 psi to push the beer. In that case, you probably need 80-85% CO2 rather than 60%.
There are two ways to determine the correct blend for your system.
Please contact our Sales Department toll-free at 888-735-5607 to discuss your options.
Check that an adequate supply of both Carbon Dioxide (CO2) and Nitrogen (N2) gases. The Trumix® Gas Blender is designed to shut down if either inlet gas runs out. Running just CO2 or N2 through the blender will ruin the beer, though this is not possible under normal operating conditions.
1. Ensure that the supply gases have adequate pressure for panel operation and adjust as necessary.
2. Locate the input gas connection tubes: (2) one for CO2 and one for Nitrogen (N2.) They are normally the tubes closest to the wall. Locate the label that is affixed to the gas connection face (normally bottom facing the ground.) This label lists the minimum and maximum inlet pressures for the blender as well as the unit’s serial number. Adjust the supply gas regulators to the appropriate minimum setting to ensure proper function. A good “rule of thumb” is to set the supply gas pressure to about 10 psi higher than the minimum recommendation on the panel and provide plenty of gas to the internal input pressure regulators.
3. Locate the mixed gas outlet pressure gauge(s) on the panel (TM-1, TM-2) face. The panel face labeling indicates their location.
a. New blender units come factory preset to 15 psi.
b. Installed and functioning units will be adjusted by the installing technician to meet the requirements of the draught system. In some cases, the installing technician will write the pressure setting with a marker close to the appropriate output pressure gauge. If not, pressure is indicated on the gauge and supply pressure is adequate. Pull the gray knob adjacent to the gauge out (away from the panel.) It should move about 1/8” and make an audible click. Increase the pressure by turning the knob clockwise (either blend).
c. It is best if the mixed gas outlet ball valve(s) are closed during this procedure.
4. Locate the outlet ball valve(s) on the panel assembly (the front panel labeling indicates their location. Make sure they are on and supply gas to the rest of the draught system.
Toll-Free:
Phone:
Address:
750 Shephard Way
Helena, MT 59601
Email: