Resources
Search / Filter
FCV5000 Spec Sheet
FCV1000 Spec Sheet
FCV0300 Spec Sheet
FCV0025 Spec Sheet
Trumix® 950 Flow Graph C25
Trumix® 950 Flow Graph C10
Trumix® 950 Flow Graph C2
TM300 Flow Graph C25
TM300 Flow Graph C10
TM900 Flow Graph C25
TM900 Flow Graph C10
Trumix® 950 Double Blend Installation Instructions
Trumix® 2000 Installation Instructions
Trumix® 4000 Installation Instructions
Trumix® 950 Triple Blend Installation Instructions
Trumix® 950 Single Blend Installation Instructions
Trumix® Beverage Triple Installation Instructions
WeldChoice Installation Instructions
TMLASERCUT Installation Instructions
Trumix® Beverage HPR Installation Instructions
Trumix® 300-900 Installation Instructions
Trumix® 3-Gas Industrial Installation Instructions
Gas Supply Nonsense
Why Mixed Gas?
Generations of women in the Smith family had prepared pot roast the same way: cutting the ends off the roast. The youngest daughter asked why, and after a chain of weird conversations, the answer was: The pot roast didn’t fit in the super small oven the great-great-grandmother had, so she chopped the ends off. If it ain’t broke, don’t fix it. But sometimes, something we are used to doing or experiencing needs another viewpoint for improvement.
People are used to wasting beer. Bartenders open the tap and stick the glass under the faucet. Owners think the 2 gallons of beer that gets dumped from the bucket at the end of the night is normal. One of our first customers was a college bar with a direct draw and 60+ beers on tap. He told us that the blender saved him over $2,000/month in wasted beer compared to using 100% CO2.
Just because we’ve done it this way for generations, or because everyone else does it that way, doesn’t mean that it is the only way to do it. The cost of the correct mixed gas can save you the installation cost several times a year and improve your sales.
Another customer upgraded their gas supply without telling any staff and found a 30% increase in sales immediately. The initial beer ordered with dinner was good, so one good beer deserves another. Just because we don’t think it’s broken doesn’t mean we can’t fix it.
If you’re seeing these foaming issues and would like some guidance, call us or your draught system technician. Maybe your draught gas supply would benefit from mixed gas.
Written by Kayla Mann; July 2019.
I Can’t Pour Nonsense
I Can’t Pour: Barbershop Kegerator Edition (what?!)
Here’s a fun one… So Emily, our Engineering Technician, and I did a presentation for the Pink Boots Society Montana Chapter about CO2 and Beer. If you don’t know, the Pink Boots Society (PBS) is a group for women in the beer and brewing industry focusing on promoting education and inclusion for women in this industry. It’s rad, we love it. Anyway, our presentation’s main goal was to give the PBS members in Montana some information/education they may not have to increase their toolbox for their jobs. Troubleshooting a system can be so difficult if you don’t have a barometer with which to measure, and I know it took me months to be even REMOTELY comfortable to help someone on the phone after the “Do you have gas?” inquiry.
Pressure and temperature fluctuations are the largest culprits for issues with a draught system and we wanted to give several examples to show the ladies a glimpse of what could happen to your system when those two variables are funky. We’re going to talk about pressure right now.
Emily’s dad’s barbershop has a kegerator; my hair salon sometimes gives me wine, so I feel shafted. Their kegerator had an almost empty keg and was pouring straight foam (maybe wine isn’t a bad idea.) So Emily’s dad called her to see if she could help with the issue. Now, Em is still learning the ins and outs of tech calls, but with all her math-nerdiness, she knows the questions to ask. I bet tech calls are MUCH easier when it’s your dad, or I could be super wrong. He told her the set pressure of the regulator for the kegerator: 20psi. Now, Em, armed with her EasyBlend app at 100% CO2, can EASILY see that 20psi is way too much pressure for a direct draw kegerator; no wonder it’s all foam! Our EasyBlend app recommends 13 psi for that specific dispense system, so they change the pressure and switch the keg. “The beer is just dribbling out, and it’s just foam,” her dad says. I bet engineers love when the math should add up but then it doesn’t, like when I split an infinitive in an email and Grammarly gets on my butt about it. So Em asks her dad to send a picture of the setup, because 13psi should work. Then we get the picture. Here it is.
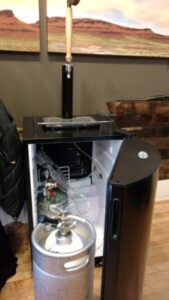
Notice anything weird or out of place? Take another look, I’ll wait.
Oh, is it the 25 FEET OF UNUSED, COILED-UP TUBING THAT COULD BE THE PROBLEM?! Of course, that was the problem. The restriction of the system because of that tubing needed 20psi to be able to get through that damn coil. But, 20psi on a keg with 100% CO2 means that the beer was just getting over-carbonated, up to 3.14 v/v!
Solution? Cut the tubing down to, you know, not 25 extra feet, and set that bad boy up to 13 psi. And use the EasyBlend app to make sure the math is right!
Our EasyBlend app is free and downloadable on the App Store or Google Play Store, and it is such an amazing tool for quick troubleshooting.
Written by Kayla Mann, May 2019.
I Can’t Pour Nonsense
I Can’t Pour: Guinness St. Patty’s Day Edition
Ahh, St. Patty’s Day. That lovely time of year when everyone is a little bit Irish and a lotta bit drunk and disorderly. I worked at an Irish pub here in Helena for a bit before I found my calling at McDantim as a sarcastic goofball who talks a lot. I had the singular distinct displeasure of working on St. Patrick’s Day shortly after being hired (Reminder: tip your bar staff enormously on St. Patty’s Day because walking through shoulder-to-shoulder crowds on a sticky floor trying not to spill beer while people are gesticulating like maniacs to get the bartender’s attention is not my idea of a good time.)
Every year, traditionally the day of or before St. Patrick’s Day, we’ll get phone calls about how the Guinness is pouring. Most times, happily, we can solve the issue quickly and the end user continues their merry way, shillelaghs and all. Unfortunately, we run into larger problems that need time to fix, which doesn’t exactly work for a tavern’s busiest day of the year. “I tried to pour my Guinness and it’s pouring like a milkshake,” or “I have to put Guinness on for the weekend on my 100% CO2 system. That should work, right?”
Fun Fact: McDantim got its start from Guinness’ quest to have the perfect mixed gas blend to dispense their liquid gold Guinness stout. We even have a commendation from Guinness for our product (shameless plug.)
Guinness, for peak pour-formance (my apologies,) uses a 25% CO2 / 75% N2 blend at around 35 psi. This combination results in the wonderful cascade of nitrogen bubbles and the creamy tawny foam. Now, let’s say you try to put Guinness on your 100% CO2 system with the same 35 psi, your carbonation level of 1.1 v/v skyrockets to 4.59 v/v. Thus, milkshake. Unfortunately, there isn’t enough time allotted in the day and a half before St. Patty’s Day to settle the keg, nor get a new one from your distributor and have it cold and unjumbled.
Here’s my plea, as a Guinness drinker not only on St. Patty’s Day: Check your Guinness several days before St. Patty’s and the bookending weekends so you can get the most out of your kegs and customers.
Written by Kayla Mann; May 2019.
Gas Supply Nonsense
I want to turn the whole thing upside down
For so long, people have been using “detector” for the nomenclature, which is patently wrong. This device shows gas flow, regardless of the gas flowing through the tubes. Detectors sometimes act more like sniffers, which just makes me think of a cartoon bloodhound, and can be purchased at your local hardware store. But for leak detection in draught beverage systems, we like to use our Pressure Degradation test (on our YouTube, shameless plug) or soapy water. Now, if you have a massive system, drenching the whole thing in soapy water in hopes of seeing bubbles can be a bit laborious. Installing an ILLI at a vital point can help you determine, when no gas is intentionally being used, if you have gas flowing.
The numbers next to the tube don’t explain the liters per minute or cubic feet per hour you’re losing. The levels on the ILLI, shown here, indicate the severity of the gas flow. And there are some cute little screens to inhibit any debris from getting into said tubes that could make the ball stick. Making sure the ILLI is installed correctly for the gas supply flow is vitally important. Gas Flow + Plastic Ball = Float. Gas Flow – Plastic Ball + Gravity = Drop. Gravity + Plastic Ball + Upside Down ILLI = Stuck & No Flow. (Dan says it can flow to a point, but if the system is pressurized suddenly, the ball can lodge and get stuck, thus No Flow.)
As a certified human dum-dum, I have installed stuff upside down more than I would like to admit. I have also forgotten about gravity, and how heartless it can be: what do you mean I can’t carry a glass of beer and bend over at the waist to pick something up and NOT spill beer all over my shoes?! Fortunately, reconnecting the tubing for the ILLI to ensure proper gas flow is much easier than trying to explain to my friends that I am NOT a hot mess who has the grace of a newborn giraffe.
The ILLI is a marvelous addition to your gas supply system, and, when installed correctly, can help you identify the gas flow so you can find and fix leaks as soon as they appear. If only I could find something to help me not spill my beer…
Written by Kayla Mann; June 2019
Carbon Dioxide Nonsense
You need a leak check buddy. Do you have your leak check buddy?
Safety concerns take up a fair amount of my time as the safety program manager here at McDantim. We work with high-pressure gases, asphyxiant gases, and normal office dangers, like papercuts and standing on wheelie chairs when no one is looking to water one of the 25 plants in my office. Now, the last concern is totally directed at me being a lazy dum-dum who doesn’t want to go get a step stool late on a Friday afternoon, but I SHOULD KNOW BETTER. We are fortunate to have checks in place to make sure everyone is safe on and off-site. We don’t go off-site very often, but when we do, it’s for training purposes: draught system troubleshooting or installs with our administrative staff so we can help you as much as possible. Plus, information and education are our pride points to provide the best customer service we can. While off-site, we have portable CO2 monitors for our employees to wear. Not all coolers are equipped with CO2 monitors, so better safe than sorry.
We get a fair amount of tech calls about leaking systems. These calls are always a little nerve-wracking for us because of the hazards associated with CO2 intoxication. “If you think you have a leak, have someone with you or watching you while you check.” We had a horrendously distressing tech call a few months back where an end user thought she had a leak. She went into the cooler and felt a little dizzy and called us for assistance. Dan took this call and told her to have someone with her or watch her while she checked. While on the phone, the other line disconnected. We proceeded to freak out here at McDantim, and her employee called and said she was passed out on the floor in the cooler. Holy crap on a cracker. Get her out of there, call 911. Call us back. Thankfully, she is fine. I even talked with a gal here in Montana who was driving to a beer fest, transporting her CO2 and jockey box in the car when she started feeling dizzy. She knew to roll down her windows and pull over to check the CO2 cylinder, which was leaking.
We want you to be safe when you check your system. We use CO2 Meter for our CO2 monitors at our facility and for out-of-office troubleshooting.
Written by Kayla Mann; June 2019
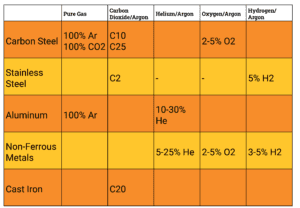
Selecting a blend for your shield gas depends on your material and welding process. Having the correct blend for your shielding gas helps increase the penetration of the welds, reduces the number of defects in the welds, and helps block out any of the naturally occurring gases in the atmosphere like Nitrogen and Oxygen.
Common welding materials include mild steel, stainless steel, aluminum, copper, and cast iron which all can benefit from mixed gas. The most used gases are Carbon Dioxide and Argon, but we’ve also seen mixtures with Helium, Hydron, or Oxygen in small percentages to increase the heat and penetration of the welds. We’ve built thousands of industrial blenders, specifically for welding, with a variety of gases and blends. Our panels can work with any application, whether you are using MIG/MAG, TIG, Arc, or laser.
Modified Atmosphere Packaging (MAP)
WHY MIXED GAS?
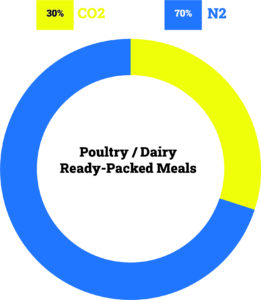
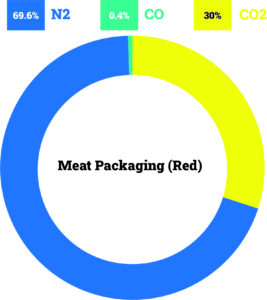
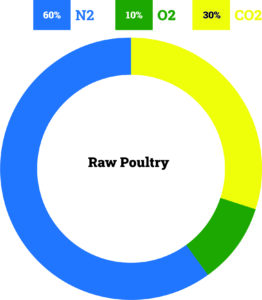
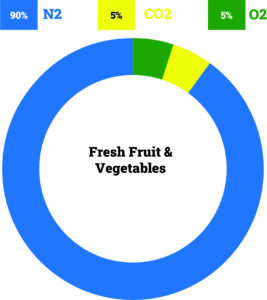
Mixed gases are imperative to the food processing and packing industry and the correct gas mix can transform the shelf life and presentation of your products.
Within the production process, mixed gas is vital for many key stages such as production, bulk distribution, retail, and final packing for consumers. Modified atmosphere packaging (MAP) can be hugely beneficial and there are several gas mixes required at different points of this process.
CUSTOMIZE YOUR BLENDS FOR ANY OF YOUR APPLICATIONS.
With MAP, different gases can play vital roles in product longevity. With unwanted processes like mold growth and oxidation both being a death sentence to packaged food, Nitrogen gas can be hugely beneficial in excluding Oxygen from food packs. Transversely, oxygen can help keep products, like cheese, fresh. For red or uncooked meat, a tri-mixture of Carbon Monoxide, Carbon Dioxide, and Nitrogen is a popular choice, as the mixture helps to keep the meat fresh and maintains the vibrant, red color.
With a McDantim Trumix® panel, successful MAP is achievable when applying the precise mixtures used in the flushing stage of the process. Using a burst or pulse filler? We offer buffer tanks in multiple sizes to fit your application.
While our Trumix® panels don’t require a storage tank to operate or mix gases to your required blend, sometimes it’s best for the life of the panel and the application to have a storage tank.
Modified Atmosphere Packaging (MAP) uses mixed gas to adjust the atmosphere either in a full space or in bursts to fill packages, extending the shelf life of certain foods. With burst filling, we recommend adding a surge or buffer tank with your Trumix® panel.
WHY:
Best case scenario
Worst case scenario
WeldChoice Dimensional Drawing
TMLASERCUT Dimensional Drawing
TMA 3 Gas Dimensional Drawing 30″
TMA 3 Gas Dimensional Drawing 20″
TM2B300 Dimensional Drawing
TM900 Dimensional Drawing
TM300 Dimensional Drawing
TM1B4000 Dimensional Drawing
TM1B2000 Dimensional Drawing
TM3B590 Dimensional Drawing
TM2B950 Dimensional Drawing
TM1B950 Dimensional Drawing
Check Valve Dimensional Drawing
Bypass Leak Indicator Dimensional Drawing
MV039 Dimensional Drawing
MV035 Dimensional Drawing
Weld Choice
Secondary TruRegs®
Secondary TruRegs® Installation Guide
TMLASERCUT
In-Line Leak Indicator
Bypass Leak Indicator Panel
How To: Replacing the Outlet Regulator
Blend Select Manifold
Our blends are calibrated in-house and can not be changed in the field. However, if your beer is pouring flat or foamy, your blend or your applied pressure is likely wrong. Many of our national distributors sell a preset blender of 60% CO2, which generally works well for Ale and Lagers. However, this may not be the right blend for some applications. For example, if you are a brew pub pouring from a serving vessel, you are probably limited to 15 psi to push the beer. In that case, you probably need 80-85% CO2 rather than 60%.
There are two ways to determine the correct blend for your system.
- Use our Blend Calculator.
- Contact us and we’ll help you calculate your blend.
Please contact our Sales Department toll-free at 888-735-5607 to discuss your options.
Check that an adequate supply of both Carbon Dioxide (CO2) and Nitrogen (N2) gases. The Trumix® Gas Blender is designed to shut down if either inlet gas runs out. Running just CO2 or N2 through the blender will ruin the beer, though this is not possible under normal operating conditions.
1. Ensure that the supply gases have adequate pressure for panel operation and adjust as necessary.
2. Locate the input gas connection tubes: (2) one for CO2 and one for Nitrogen (N2.) They are normally the tubes closest to the wall. Locate the label that is affixed to the gas connection face (normally bottom facing the ground.) This label lists the minimum and maximum inlet pressures for the blender as well as the unit’s serial number. Adjust the supply gas regulators to the appropriate minimum setting to ensure proper function. A good “rule of thumb” is to set the supply gas pressure to about 10 psi higher than the minimum recommendation on the panel and provide plenty of gas to the internal input pressure regulators.
3. Locate the mixed gas outlet pressure gauge(s) on the panel (TM-1, TM-2) face. The panel face labeling indicates their location.
a. New blender units come factory preset to 15 psi.
b. Installed and functioning units will be adjusted by the installing technician to meet the requirements of the draught system. In some cases, the installing technician will write the pressure setting with a marker close to the appropriate output pressure gauge. If not, pressure is indicated on the gauge and supply pressure is adequate. Pull the gray knob adjacent to the gauge out (away from the panel.) It should move about 1/8” and make an audible click. Increase the pressure by turning the knob clockwise (either blend).
c. It is best if the mixed gas outlet ball valve(s) are closed during this procedure.
4. Locate the outlet ball valve(s) on the panel assembly (the front panel labeling indicates their location. Make sure they are on and supply gas to the rest of the draught system.

